Tag Archives: #wholefoods

Sweet Potato Curry with Coconut Milk from Karnataka

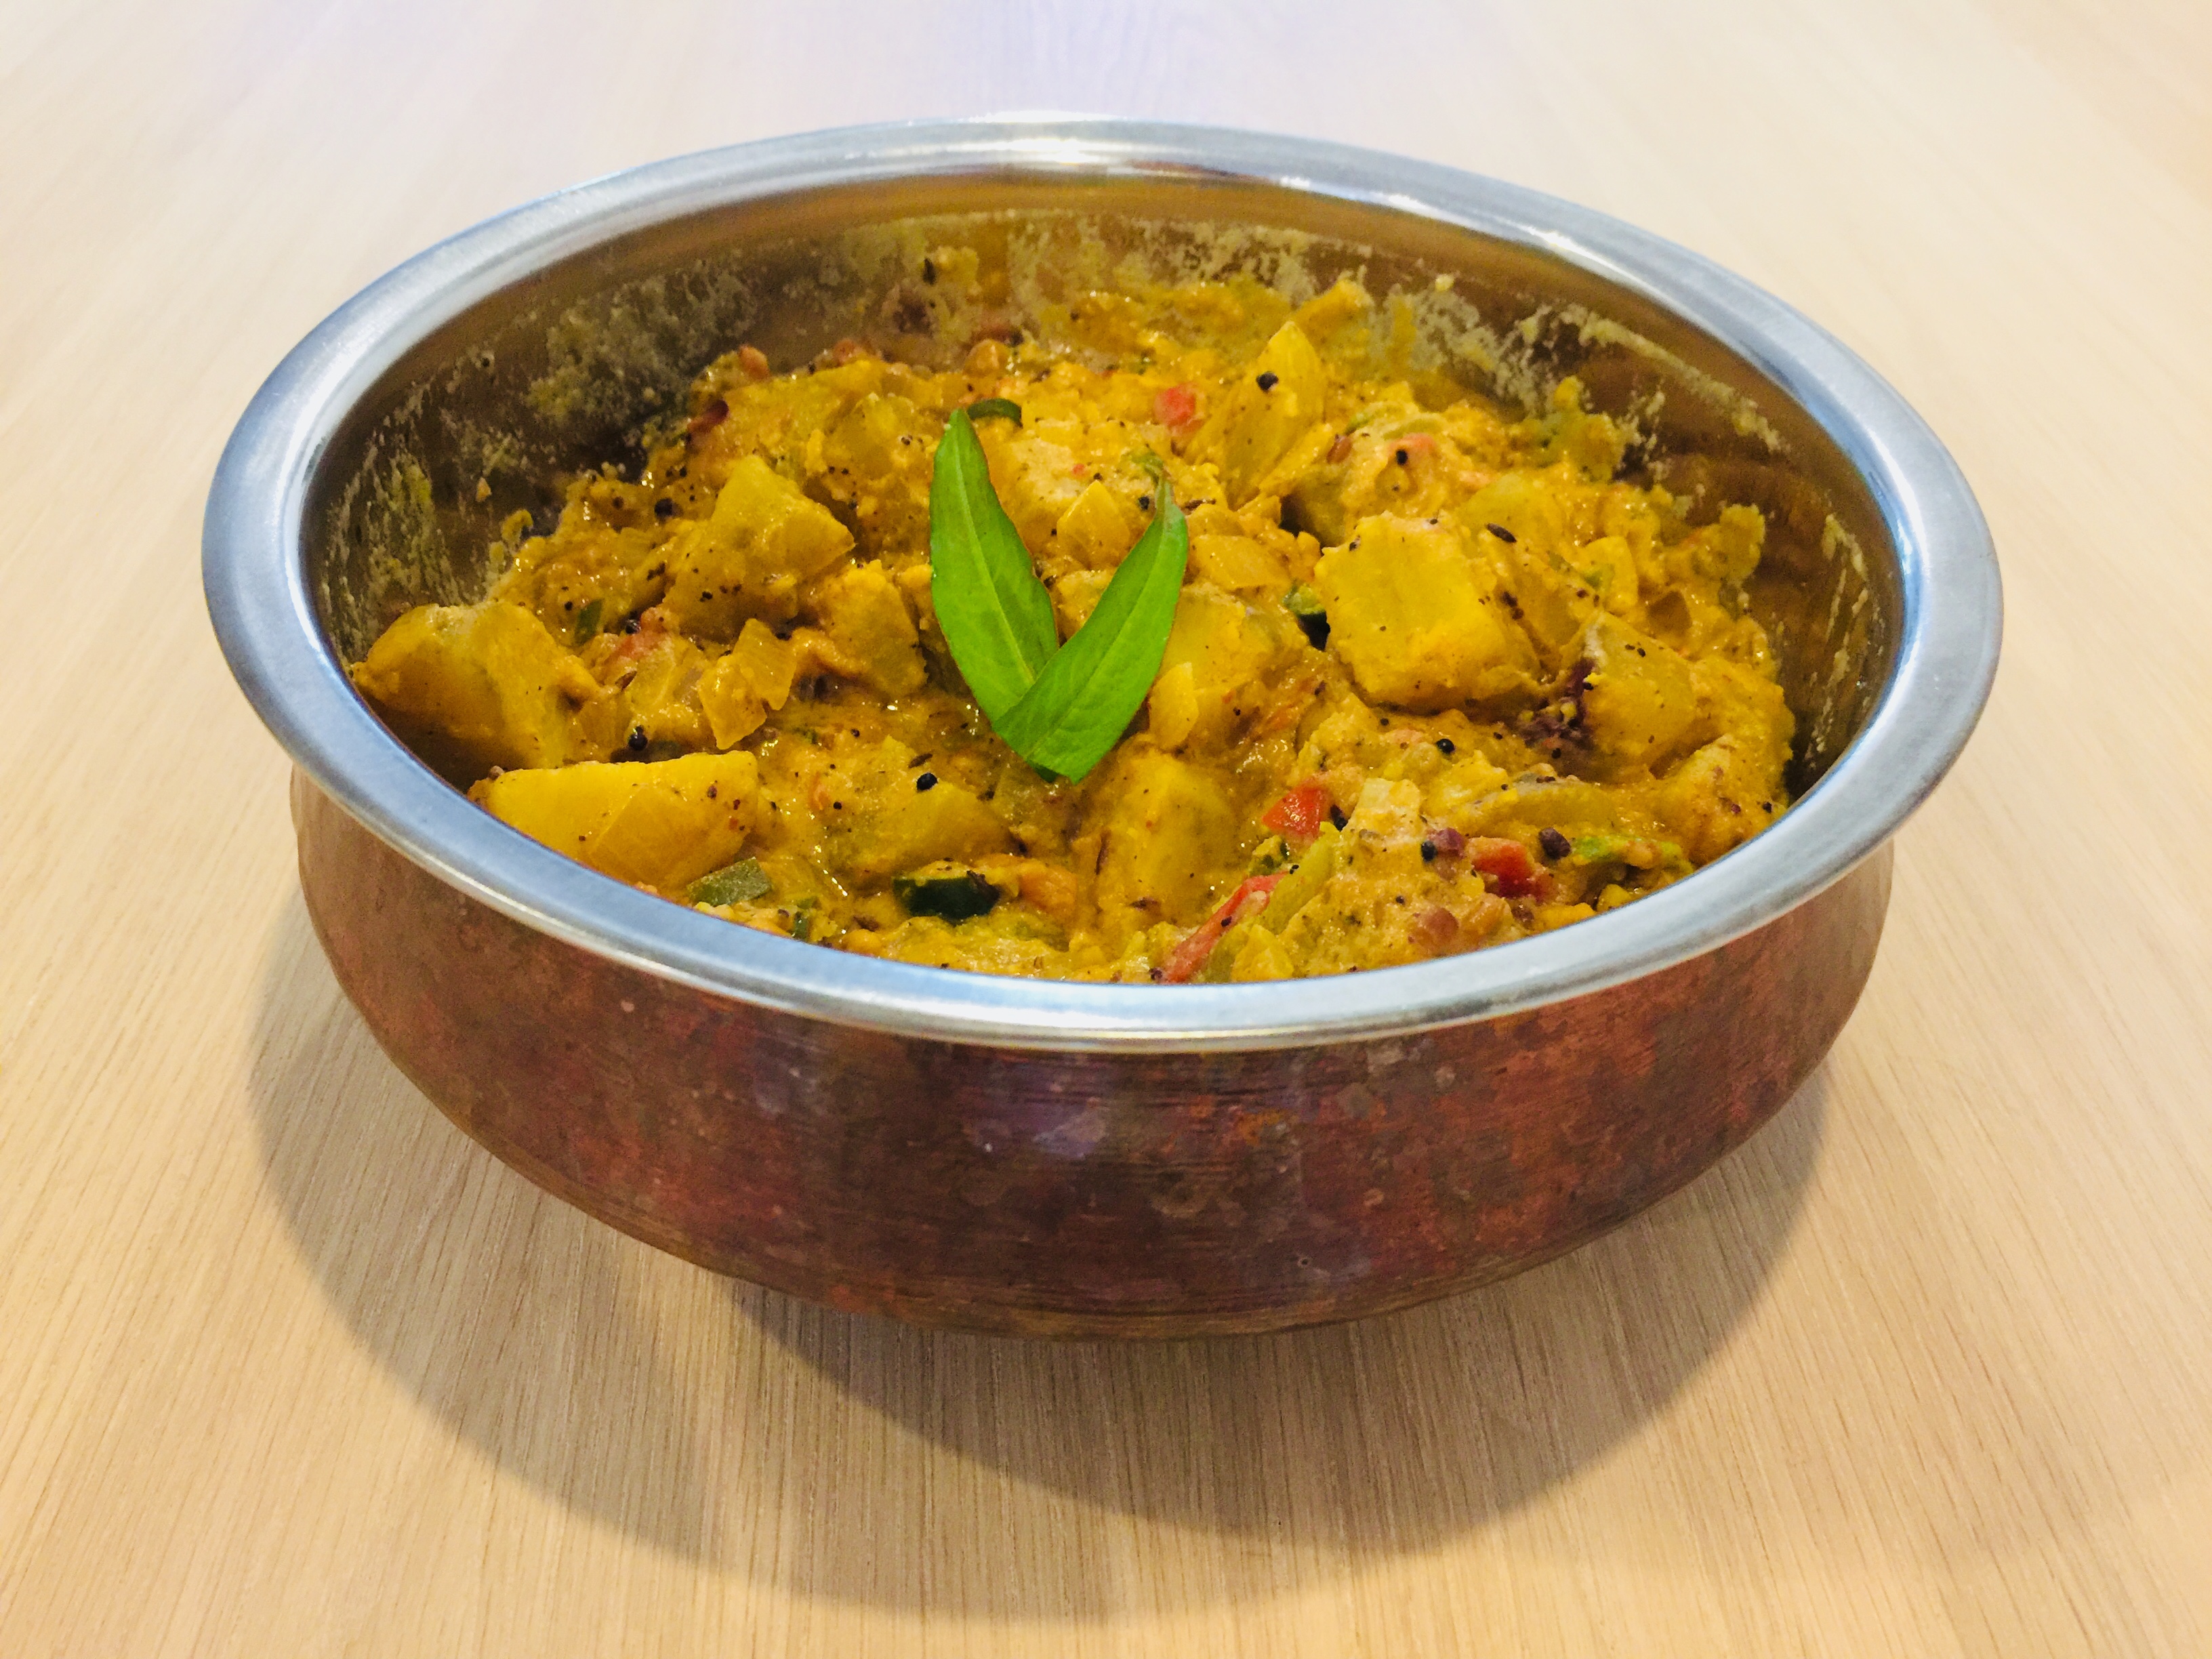
When we lived in India I needed to go to Cochin in Kerala for work. The market research session I was attending didn’t start until the afternoon, so I had the morning to explore Fort Cochin. There amoungst the alleyways I found a tiny little bookshop piled high with books. A wonderful little treasure trove. From that store I bought a South Indian Vegetarian cookbook which I love exploring. This recipe is based on that for Urulaikizhangu Saagu which is a Potato Curry from Karnataka. Using sweet potatoes to make a Sweet Potato Curry gives it a slightly richer flavor (and a few more vitamins), and I skipped the process of making homemade coconut milk, and stuck to a store bought can for convenience. It is truly delicious!

Ingredients

  • 3 large sweet potatoes
  • 1 270ml can coconut milk
  • 2 large onions, finely chopped
  • 2 green chilies, de-seeded and finely chopped
  • 2cm piece of ginger, peeled, grated
  • 2 large tomatoes, chopped
  • 1/2 tsp turmeric powder
  • 1 1/2 tsp salt

Spice paste

  • 1 tsp poppy seeds
  • 3 dried chillies
  • 1 Tbsp Bengal gram or Moong dal
  • 1 Tbsp coriander seeds
  • 1/2 tsp fennel seeds
  • 1 cinnamon stick

Tempering

  • 1 tsp mustard seeds
  • 1 tsp cumin seeds
  • 1 tsp urad dal
  • 1 tsp Bengal gram or Moong dal
  • 1 dried chilli
  • 1 sprig curry leaves

Directions

  1. Peel the sweet potatoes. Cut into 1-2cm cubes. Cook in salted, boiling water until tender. Drain and set aside
  2. Grind ingredients for spice paste in a mill accessory on a blender or food processor. Gradually add 2-3 Tbsp to make a paste
  3. Heat some oil in a large frying pan. Add all the Tempeeing ingredients and fry until the mustard seeds start to splutter
  4. Add the onions to the Tempered spices and fry until golden, around 3 minutes
  5. Add green chilies, ginger, tomatoes, turmeric, and salt. Fry for about 2 minutes
  6. Add 1 cup of water and turn up the heat (from 6 to 7 on an induction cooktop). Simmer for 4-5 minutes stirring occasionally
  7. Turn down the heat (to 6 on an Induction cooktop). Mix in the spice paste and sweet potatoes and cook for a further 5 minutes, stirring frequently to ensure all ingredient should are well mixed together and the mixture does not catch on the pan
  8. Pour in the can of Coconut Milk and stir to combine thoroughly. Simmer for a few minutes over a low heat.
  9. Serve with rice, idli, dosa, or roti

Gluten Free Pikelets

Liam decided he wanted to cook this morning and had a whole bunch of ingredients out on the bench. Including, cheese, chocolate, eggs, flour, maple syrup and almond milk. “I want to make a cheesey, chocolatey, little pancake” he said. “I’m not sure about the feta and chocolate together, but we could make little pikelets with melted chocolate” I replied, “oh, but there is loads of sugar in pikelets” I muttered. “No problem, we can use maple syrup instead of sugar” he said. And so this recipe was born. A slightly sweeter, thicker pancake mix, with baking powder so that it would rise, and it worked really well.

Ingredients

  • 1 cup (250ml) gluten free flour
  • 1 tsp baking powder
  • 2 Tbsp maple syrup
  • 1 egg
  • 180ml almond milk
  • pinch of salt
  • a little water

Directions

  1. Add all ingredients into a bowl and mix well
  2. Add a little water to get a thick batter, but one that can be spooned into the pan (about 50ml depending on your flour).
  3. Heat a frying pan on a moderate heat (induction 6).
  4. Place a desert size scoop of batter into the pan. Spread it a little to have the batter an even thickness of approx 1/2cm thick.
  5. Cook all the batter in batches and serve warm with melted chocolate, honey, jam and coconut yoghurt, or other toppings of your choice

Black and White Sesame Seed Salmon

Salmon with black and white sesame seeds

This is a very easy, but visually interesting meal. You could pair it with a baby spinach or rocket salad, with fennel and grapefruit (to use up the grapefruit in the recipe) and Sweet Potato Fries with Garlic Aioli out of the Air Fryer.

Ingredients

  • 1 Tbsp black sesame seeds
  • 1 Tbsp white sesame seeds
  • 1 Tbsp grapefruit juice
  • 1 tsp honey
  • pinch of sea salt
  • freshly ground black pepper
  • 2 salmon fillets
  • Coconut oil

Directions

  1. Season the salmon fillets with sea salt and freshly ground pepper
  2. Mix the black and white sesame seeds, grapefruit juice and honey together in a small bowl
  3. Spoon the sesame seed mix onto the top of the salmon fillets (skin side down, do not put the sesame seeds on top of the skin). Spread the sesame seeds out to form a crust on top of the salmon fillets
  4. Fry in a little coconut oil over a moderate to low heat until the salmon fillets are cooked half way through – skin side down first. Turn over and cook until cooked through. About 2 minutes on each side.

Music to go with it…
Listen on Spotify: Marisa Nadler – July

Caramelized Onions and Mushrooms

Chicken Burgers, avocado and tahini spread, red onion and mushroom in vinegar

This side dish of caramelised onions and mushrooms is great as a topping to vegetarian or other burgers, on top of a steak, or as a side dish to eat on its own with a vegetarian or vegan meal. While this time we made it to top Chicken Burgers, we often eat it next to a pile of sweet potato chips from the Air Fryer with a salad. 

Ingredients

  • 1 large onion, sliced
  • 2 garlic cloves, chopped
  • 6 mini portobello mushrooms, sliced
  • 1 Tbsp good quality red wine vinegar
  • 1/2 tsp dried Italian herbs
  • pinch of sea salt
  • a few grinds of freshly ground black pepper

Directions

  1. Add some coconut oil to a pan
  2. Fry the onions for a couple of minutes until they have softened
  3. Add garlic, herbs, salt and pepper. Fry for 1 minute more until the garlic has also softened
  4. Add vinegar and fry for 1 more minute
  5. Add the mushrooms and fry for 2-3 minutes more until the mushrooms have softened and are cooked to your liking
  6. Use on top of vegetarian or chicken burgers, as a whole food topping for a steak, or as a side dish on its own with a vegetarian or vegan meal

Music to go with it…
Listen on Spotify: Zero 7 – EP3


Avocado Tahini Spread

Tahini Avocado Spread

Chicken burgers are really tasty, but they can also use a little something to spice them up. We made this avocado and tahini spread to top them along with Caramelised Onions and Mushrooms in vinegar. 

This is a variation of a recipe that we also use as a dip for sweet potato chips which we cook in the Air Fryer, and we also used this spread for that as well. It would also be great with raw vegetables used as a dip. 

Ingredients

  • 1 ripe avocado
  • juice of 1 lemon
  • 1 Tbsp tahini
  • 2 garlic cloves
  • 1 large red chilli
  • 5 spring onions
  • 1 tsp cumin seeds
  • 1 tsp ground coriander
  • 1/2 tsp salt
  • a few grinds of freshly ground black pepper
  • olive oil

Directions

  1. Put everything in a blender add around 4 Tbsp of olive oil
  2. Blend until smooth.
  3. Add a little more olive oil if the mixture is too thick or does not blend well
  4. Serve as a topping on Chicken Burgers, as a dip with Sweet Potato Chips cooked in the Air Fryer, or use as a spread for savoury dishes.

Music to go with it…
Listen on Spotify: Netorare Fan Club – Make Believe


Chicken Burgers

Chicken Burgers

Our son is a big fan of burgers, in all shapes, sizes and meat and veg descriptions. This week I did an order from the butcher and managed to order chicken mince by mistake. While they have lovely anti-biotic free range chickens, somehow I managed to add chicken mince and poussin to the order… The things you do when you are not entirely concentrating on what you are doing. 

Never one to waste food, it sounded like a good excuse to make some chicken and thyme burgers. We topped them with an avocado tahini spread and red onions and mushrooms cooking in red wine vinegar. Even on an after work night it was a quick wholefood meal to whip up, that got the seal of approval from our son (empty plate = seal of approval right?)

Ingredients

  • 500g minced chicken
  • 1 egg
  • 1 Tbsp fresh thyme
  • 1 Tbsp fresh dill
  • juice of 1/2 a lemon
  • 1/2 tsp salt
  • freshly ground black pepper
  • 1/2 tsp paprika
  • 1 tsp Italian dried herbs (mix of dried marjoram, basil, capsicum, rosemary, oregano, parsley and thyme)
  • coconut oil to fry

Directions

  1. Mix all ingredients (except coconut oil) in a bowl. This will be a very wet mixture.
  2. Form the mixture into balls a bit smaller than a tennis ball
  3. Heat some coconut oil in a frying pan
  4. Place the ball into the frying pan and press with the back of a wooden spoon or spatula to flatten the ball into a burger.
  5. Fry for 4-5 minutes on both sides until the chicken is cooked through
  6. Serve with tahini avocado spread, red wine options and mushrooms, sweet potato chips and homemade mustard

Music to go with it…
Listen on Spotify: Shout out louds – Howl Howl Gaff Gaff

Homemade Carrot Kimchi

Homemade Korean Carrot Kimchi

No Korean meal is complete without a side dish of Kimchi. It is a national obsession, and rightly so. There are many health studies which show the benefits of this fermented wonderfood!

We have a favourite little Korean BBQ restaurant here in Singapore, and they serve a trio of Kimchi’s. This got us investigating what other Kimchi variations we could make, including this carrot Kimchi.

Chopping the carrot finely takes some work, and you could also grate it to save you some time if you like (although then it will look a little less pretty).

Ingredients

  • 1 kg carrots
  • 1 1/2 Tbsp coarse sea salt

Kimchi paste

  • 1 Tbsp gochugaru, Korean chilli powder
  • 50g leek, shredded
  • 1 tsp minced garlic
  • 1 tsp finely grated ginger
  • 100g fresh daikon / mooli radish, coarsely grated or finely sliced (can be substituted for regular radish, but decrease the amount as it is stronger in flavour)
  • 1/2 tsp fish sauce
  • 1 Tbsp salt

Directions

  1. Peel the carrots and slice them very finely (Julienne). Place them in a bowl and add the salt. Cover the carrots with water and leave them to stand overnight at room temperature
  2. Taste the carrots to check the seasoning and wash in water until it is just too salty for your taste
  3. A good kimchi contains enough salt, but to get it right it is important to taste it. If it is very salty then you need to rinse it more. Rinse it multiple times, tasting  each time until it is just too salty for your taste. If it tastes salty enough for your taste, then it is probably not salty enough, and you should add more salt to the mixture (2 Tbsp rather than 1 Tbsp) when you are making the Kimchi paste.
  4. Mix together all of the ingredients for the Kimchi paste in a bowl
  5. Add the carrots and mix thoroughly using your hands
  6. Place the carrot Kimchi into a jar or bowl with a tight fitting lid. Press them into the jar to be tight fitting, but do not use any real force in doing so.
  7. Put the kimchi into the fridge and let it stand for 10 days
  8. It will keep for approximately 1 month in the fridge

Music to go with it…
Listen on Spotify: City and Colour – Bring Me Your Love

Homemade Korean Kimchi

Homemade Korean Kimchi

One of our son’s best friends at school is Korean, and his mother was nice enough to give us some Korean gochugaru chilli powder. We had been talking to her about how much we loved Korean food, and that we were keen to try making our own Kimchi. After convincing her to swap a BBQ for a Korean dinner at her place, she decided it was our time to cook next and gifted us the chilli powder to make the much talked about Kimchi.

Kimchi is a fermented vegetable dish, much like sauerkraut, except spicy.  The national dish of Korea (and a national obsession), no Korean meal is complete without it. The fermentation process of making it also makes it great for your gut health and there are many studies on its health benefits.

There is no definitive recipe for Kimchi, rather you can make a lot of variations of the basic recipe. Adding carrot or cucumber are some suggestions to get you started. Enjoy!

Ingredients

  • 2 kg Chinese leaf cabbage
  • 200g sea salt

Kimchi paste

  • 150g gochugaru, Korean Chilli Powder (do not substitute for regular chilli powder as this is more like a paprika powder, with a little chilli added. Regular chilli powder would be far too hot)
  • 300g leek, finely chopped
  • 2 Tbsp garlic, minced
  • 2 Tbsp ginger, finely grated
  • 200g fresh daikon / mooli radish, grate on wide grater, or finely shred (you could substitute for regular radish, but cut it is a little more intense in flavour, so decrease the amount and cut it up finely)
  • 1 Tbsp fish sauce
  • 1-2 Tbsp salt

Directions

  • Cut the Chinese cabbage in half lengthwise to expose all of the leaves. Place the halves cut side up in a bowl. Salt the cabbage layer by layer. You don’t have to be too perfect at this.

Korean Kimchi

  • Place into a large bowl and cover with enough water to completely submerge it. Place a heave object on top to keep the cabbage submerged under water. I used a pestle, but you could use a bowl, plate, or jar as well.
  • Repeat for each of the cabbage halves until you have used up all of the salt and roughly salted all of the cabbage leaves
  • Cover with a tea-towel and let it stand for 24 hours at room temperature in the brine mixture.
  • Drain the water and taste a bit of the cabbage from the middle to check for how salty it has become.
  • A good kimchi contains enough salt, but to get it right it is important to taste it. If it is very salty then you need to rinse it more. Rinse it multiple times, tasting from a middle leaf each time until it is just too salty for your taste. If it tastes salty enough for your taste, then it is probably not salty enough, and you should add more salt to the mixture (2 Tbsp rather than 1 Tbsp) when you are making the kimchi paste.
  • Carefully squeeze the liquid out of the Chinese cabbage
  • Mix together all of the kimchi paste ingredients in a bowl.

Korean Kimchi

  • Either you can leave the cabbage halves still whole, or you can cut the ends off them in order to separate the leaves. I cut the ends off to make it easier to put them into the jar that I had available.
  • Mix the Chinese cabbage and kimchi paste thoroughly with your hands. It will wash off easily, and there isn’t really a good substitute to just getting in there and getting dirty!

Homemade Korean Kimchi

  • If you are leaving the cabbage halves whole, then make sure that you lift the leaves up and press the paste in between them.
  • Place the kimchi into a jar or bowl with a tight fitting lid. Press into the container so that it is tightly packed, but don’t use too much force in doing so. You just want to press it into the container to completely fill it.
  • Leave the kimchi to stand on the bench for 24 hours.
  • Transfer to the fridge and leave it for 7-10 days before you start to eat it.
  • It will last for around 2 months in the fridge.

Music to go with it…
Listen on Spotify: The Very Best – Makes a King

Turkish Snack Bars

Turkish snack bars

We didn’t enter a wholefood lifestyle to lose weight. We started looking after ourselves better to improve our health and start feeling better. But the consequence has also been that as we have taken out the junk, the processed food, and the fried food from our diets, our weight has also dropped. But we also don’t want it to drop too much or too fast.

That is where a little bit of healthy snacking comes in. But most shop bought snacks have ingredients I don’t recognize, or sugar that I don’t want to eat. The alternative are pretty expensive raw snack bars. As a result, we have taken to making our own snack bars and keeping them in the fridge. I make one or two batches in the weekend (which takes me less than 10 minutes) and they keep all week. Given that they are all dried ingredients, they should actually keep quite a long time, but they have never last longer than a week in our house to find out.

These snack bars are inspired by the flavours of Turkey. Rich pistachios and almonds are bound together with the sweetness and stickiness of dates. They are a great snack to keep in the fridge and snack on with an espresso or on its own.

Ingredients

  • 1 cup pistachios
  • 1 cup dried apricots
  • 1 cup dried dates
  • 10g extra pistachios, chopped, for garnishing

Directions

  1. Place the pistachios in a food processor with the metal knife blade inserted. Pulse until they are finely chopped.
  2. Add the apricots and dates to the food processor and turn the speed up to a medium speed. Process for about 1 minute until the fruits and nuts are all finely chopped and start to stick together.
  3. Grease a metal tray with a little coconut oil. Pour the mixture onto the tray and press down firmly with your hands to form a large square / rectangular shape. You need to press quite firmly to press all of the mixture together.
  4. Chop the extra 10g (a small handful) of pistachios and sprinkle over the top of the bar. Press down into the mixture with your hands firmly so that it sticks into the bars as a garnish
  5. Place in the fridge for an hour
  6. Cut into bar shapes and store in an airtight plastic container between layers of greaseproof baking paper.

Music to go with it…
Listen on Spotify:

Persian Stuffed Poussin

Persian stuffed Poussin

We love Middle Eastern Food! There are so many rich flavours and ingredients to explore that we never tire of exploring its kitchen. The Persian (Iranian) kitchen uses liberal doses of pistachios, dates, figs and pomegranates. What is not to love? 

Inspired by the tastes of Persia and the Middle East, this stuffed Poussin or Chicken is very rich in flavour with dates, prosciutto and mixed nuts combining to make a very rich stuffing. It was delicious with the Persian Avocado Salad that we created to go with it too!

Ingredients

  • 1 large poussin (or small chicken)
  • juice of 1/2 lemon
  • a pinch of sea salt
  • a few grinds of freshly ground black pepper
  • 5 garlic cloves
  • handful of thyme sprigs (exact amount does not matter as it will just add aroma)
  • 2 Tbsp coconut oil
  • 1 Tbsp ghee or butter

Stuffing

  • 75g pitted dates
  • 30g blenched almonds
  • 30g cashew nuts
  • 2 slices parma ham / prosciutto

Directions

  1. Heat the oven to 200 degrees Celsius (400 degrees fahrenheit)
  2. Chop up all of the ingredients for the stuffing into small pieces. Alternatively, place all stuffing ingredients in a food processor and pulse to chop roughly.
  3. Stuff the poussin (or chicken) with the mixture and tie the bird closed using kitchen string.
  4. Place the bird breast side down into an oven tray and brush with coconut oil, ghee and 1/2 the lemon juice. Sprinkle over a pinch of course sea salt and a few grinds of freshly ground black pepper.
  5. Add the garlic (unpeeled) and the thyme to the tray.
  6. Place the tray in the oven and bake for around 35 minutes depending on the size of your bird. It should be golden brown and crispy on the side that is visible to you when you open the oven.
  7. Turn the bird over and baste with the rest of the lemon juice and a little more coconut oil. Return to the oven and bake for another 20 minutes until the top of the chicken is also golden brown and crispy.
  8. When the chicken is ready, leave it to rest for a few minutes before carving and serving it.
  9. Serve with the Persian Avocado salad and some sweet potato chips from the Air Fryer

Music to go with it…
Listen on Spotify: Bony King – Wild Flowers