Tag Archives: paleo

Vegan Chocolate Biscotti

Chocolate, pistachio, cardamon biscotti

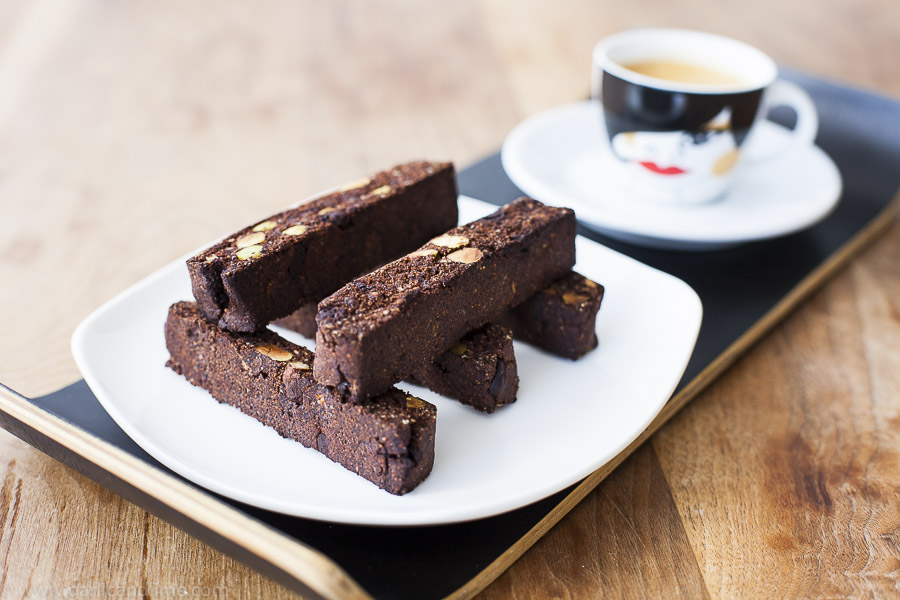
Biscotti are twice cooked Italian biscuits. You cook them first as a log, and they come out of the oven a soft cookie texture. After cutting them into slices you cook them a second time. This time they end up dry and crunchy, and perfect for dunking into a coffee or hot chocolate.

This version of the recipe uses almond and coconut flour to make them gluten free, maple syrup to avoid refined sugars, and no eggs to make them Vegan and Vegetarian. Despite being a significant variation on the traditional recipe they are a delicious, crunchy Biscotti that are no shame to the original recipe. The almond flour gives them a lovely richness that makes them feel more sinful than they are!

Unfortunately our son has just sneaked half the batch while we were out so we have to make a second batch already…

Ingredients

  • 100g blanched almonds (or 1 cup almond flour)
  • 1/4 cup coconut flour
  • 1/4 cup unsweetened cocoa powder
  • 1 tsp cardamon powder
  • 1/2 teaspoon baking soda
  • 1/4 tsp sea salt
  • 1/4 cup maple syrup
  • 1/2 cup pistachio nuts
  • 1/4 cup dark chocolate, chopped into small chunks

Directions

  1. Pre-warm the oven to 180 degrees Celsius (350 degree Fahrenheit)
  2. Blend the almonds in a food processor with a metal blade (preferably the mini food processor attachment or a chopper accessory on a blender) until they are a fine powder (alternatively use almond flour
  3. Add the ground almonds, coconut flour, cocoa powder, cardamon powder, baking soda, and sea salt to a food processor. Process to combine all of the ingredients
  4. Add the maple syrup and process to combine all of the ingredients. (Note: If you prefer sweet biscuits you might like to increase the amount of maple syrup to 1/2 a cup. This is not a particularly sweet biscuit recipe.)
  5. The mixture should start to form into a ball. Let it rest for 5 minutes for the coconut flour to absorb the maple syrup.
  6. Remove the mixture and place it on a piece of greaseproof paper. Knead in the pistachio nuts and chocolate to mix it through the mixture evenly
  7. Place a sheet of greaseproof paper on a baking tray and place the mixture in the middle of the tray. Shape the mixture to form a block about 20cm long, 10 cm wide, and 2 cm thick.
  8. Cook the biscotti in the oven for 15 minutes.
  9. Remove from the oven and allow to cool (approximately 1 hour)
  10. Slice the log into 1cm wide biscuits using a bread knife. It is important that they are even in width as you are going to cook them again.
  11. Spread the slices of biscuit evenly on a baking tray lined with greaseproof baking paper
  12. Cook again for 15 minutes until the biscotti are crisp and crunchy but not hard
  13. Allow to cool and serve alongside coffee or hot chocolate

Music to go with it…
Listen on Spotify: Carbon Handshake – A Dive Right

Escape Juice

Banana watermelon juice

Our little Juicemaster son has been busy experimenting with his juicer and blender again and has created this very simple, but refreshing juice. Packed full of vitamins it could also all be made in the blender if you don’t have a juicer, but it would then be thicker as all the fiber of the watermelon would still be included. This Lego criminal thinks it has all the right ingredients to aid his escape.

Ingredients

  • 3 bananas
  • 1/4  watermelon
  • handful of ice
  • Juicer machine
  • Blender

Directions

  • Remove the rind from the watermelon. Juice in a centrifugal or slow juicer on the slowest speed to extract as much juice as possible.
  • Pour the watermelon juice into the blender. Add the banana and a handful of ice. Blend for 30 seconds until well combined
  • Serve over ice for a refreshing juice

Music to go with it…
Listen on Spotify: Graveyard Club – Nightingale

Rucola, Spinach, Asparagus Salad

Rucola, spinach, asparagus salad

The focus of our food philosophy is on prioritizing vegetables and fruit over other food groups, and making sure that we are feeding our bodies nutrient rich food. Living in the eternal heat that is Singapore has resulted in us eating a lot of salads, and having a salad for lunch is a great kick starter for the amount of vegetables that we are eating in a day.

This salad has become one of our favourites. Using both rucola and baby spinach leaves adds some interest to the lettuce base, while the beans or asparagus add a little more substance to the meal. The sesame seeds finish it off attractively, while also adding essential nutrients. You could also consider adding pumpkin seeds, sunflower seeds or pine nuts to the garnish, especially if you remove the parma ham to make it a vegetarian or vegan salad.

Ingredients

  • 150g rucola leaves
  • 150g baby spinach leaves
  • 1 red onion, thinly sliced
  • a few slices of parma ham (Prosciutto) (optional)
  • 75g green beans or small asparagus
  • coarse sea salt
  • freshly ground black pepper
  • 2 Tbsp olive oil
  • 1 Tbsp red wine vinegar
  • 1 tsp black sesame seeds
  • 1 tsp white sesame seeds

Directions

  1. Heat the oven to 200 degrees Celsius (400 degrees Fahrenheit)
  2. Lay the parma ham out on a sheet of baking paper on a baking tray. Cook in the oven for 8-10 minutes or until crispy
  3. Cook the beans or asparagus in a pot of boiling water that is lightly salted for 2-5 minutes until only just cooked. Remove from the pot and quickly wash under running water to cool them down and prevent further cooking.
  4. Wash the rucola and spinach leaves and place them in a salad bowl
  5. Spread the onion and beans or asparagus over the rucola and spinach
  6. Combine the sea salt, black pepper, olive oil and vinegar in a glass and stir well to combine. Pour the vinaigrette over the salad, and toss the leaves to coat them all.
  7. Stir the black and white sesame seeds together in a small glass or bowl to mix them up
  8. Spread the crispy parma ham over the salad, and top with a sprinkling of the sesame seeds to garnish.

Music to go with it…
Listen on Spotify: Roadkill Ghost Choir – In Tongues

Caramelized Onions and Mushrooms

Chicken Burgers, avocado and tahini spread, red onion and mushroom in vinegar

This side dish of caramelised onions and mushrooms is great as a topping to vegetarian or other burgers, on top of a steak, or as a side dish to eat on its own with a vegetarian or vegan meal. While this time we made it to top Chicken Burgers, we often eat it next to a pile of sweet potato chips from the Air Fryer with a salad. 

Ingredients

  • 1 large onion, sliced
  • 2 garlic cloves, chopped
  • 6 mini portobello mushrooms, sliced
  • 1 Tbsp good quality red wine vinegar
  • 1/2 tsp dried Italian herbs
  • pinch of sea salt
  • a few grinds of freshly ground black pepper

Directions

  1. Add some coconut oil to a pan
  2. Fry the onions for a couple of minutes until they have softened
  3. Add garlic, herbs, salt and pepper. Fry for 1 minute more until the garlic has also softened
  4. Add vinegar and fry for 1 more minute
  5. Add the mushrooms and fry for 2-3 minutes more until the mushrooms have softened and are cooked to your liking
  6. Use on top of vegetarian or chicken burgers, as a whole food topping for a steak, or as a side dish on its own with a vegetarian or vegan meal

Music to go with it…
Listen on Spotify: Zero 7 – EP3


Avocado Tahini Spread

Tahini Avocado Spread

Chicken burgers are really tasty, but they can also use a little something to spice them up. We made this avocado and tahini spread to top them along with Caramelised Onions and Mushrooms in vinegar. 

This is a variation of a recipe that we also use as a dip for sweet potato chips which we cook in the Air Fryer, and we also used this spread for that as well. It would also be great with raw vegetables used as a dip. 

Ingredients

  • 1 ripe avocado
  • juice of 1 lemon
  • 1 Tbsp tahini
  • 2 garlic cloves
  • 1 large red chilli
  • 5 spring onions
  • 1 tsp cumin seeds
  • 1 tsp ground coriander
  • 1/2 tsp salt
  • a few grinds of freshly ground black pepper
  • olive oil

Directions

  1. Put everything in a blender add around 4 Tbsp of olive oil
  2. Blend until smooth.
  3. Add a little more olive oil if the mixture is too thick or does not blend well
  4. Serve as a topping on Chicken Burgers, as a dip with Sweet Potato Chips cooked in the Air Fryer, or use as a spread for savoury dishes.

Music to go with it…
Listen on Spotify: Netorare Fan Club – Make Believe


Chicken Burgers

Chicken Burgers

Our son is a big fan of burgers, in all shapes, sizes and meat and veg descriptions. This week I did an order from the butcher and managed to order chicken mince by mistake. While they have lovely anti-biotic free range chickens, somehow I managed to add chicken mince and poussin to the order… The things you do when you are not entirely concentrating on what you are doing. 

Never one to waste food, it sounded like a good excuse to make some chicken and thyme burgers. We topped them with an avocado tahini spread and red onions and mushrooms cooking in red wine vinegar. Even on an after work night it was a quick wholefood meal to whip up, that got the seal of approval from our son (empty plate = seal of approval right?)

Ingredients

  • 500g minced chicken
  • 1 egg
  • 1 Tbsp fresh thyme
  • 1 Tbsp fresh dill
  • juice of 1/2 a lemon
  • 1/2 tsp salt
  • freshly ground black pepper
  • 1/2 tsp paprika
  • 1 tsp Italian dried herbs (mix of dried marjoram, basil, capsicum, rosemary, oregano, parsley and thyme)
  • coconut oil to fry

Directions

  1. Mix all ingredients (except coconut oil) in a bowl. This will be a very wet mixture.
  2. Form the mixture into balls a bit smaller than a tennis ball
  3. Heat some coconut oil in a frying pan
  4. Place the ball into the frying pan and press with the back of a wooden spoon or spatula to flatten the ball into a burger.
  5. Fry for 4-5 minutes on both sides until the chicken is cooked through
  6. Serve with tahini avocado spread, red wine options and mushrooms, sweet potato chips and homemade mustard

Music to go with it…
Listen on Spotify: Shout out louds – Howl Howl Gaff Gaff

Nutty breakfast “muesli”

Nutty breakfast Muesli

Breakfast is the most important meal of the day, but not the easiest when you are trying to avoid processed food. We have become so conditioned to toast with spreads, or muesli with yoghurt that we hardly think of other options for breakfast.

While our Sago Porridge has become our standard breakfast, the one we make without thinking, it is really nice to have some variation, especially variation that can be made ahead of time and whipped up quickly before work. Because let’s face it, it isn’t as though we suddenly found a whole heap of extra time when we changed our lifestyle, but we did prioritize food and cooking our own meals over television time 🙂

This breakfast muesli was actually created by our son (6). He wanted to make breakfast for us, and started looking through the pantry for things to put in it. Together with Barry he pulled out all of these ingredients, and then with the help of Papa he put them together for our breakfast. It was really good, and worthy of including here. Enjoy!

Ingredients

  • 20g cashew nuts, chopped
  • 20g pinenuts, chopped
  • 20g blanched almonds, chopped
  • 20g shelled pistachios, chopped
  • 1 tsp coconut oil
  • 20g goji berries
  • 2 apples, chopped
  • 4 pitted dates, chopped
  • 1 dried fig, chopped
  • 1/2 tsp cinnamon
  • good squeeze of lemon juice
  • pinch of sea salt

Directions

  1. Toast the nuts in a frying pan together with 1 tsp of coconut oil until they are golden brown and crispy. Remove from the pan. Sprinkle with a pinch of sea salt. (Note: This can be made in larger quantities and stored in an airtight container to use later if you like.)
  2. Chop the apples into bite sized pieces. Place in a bowl. Sprinkle with cinnamon and toss to coat all of the apple pieces.
  3. Sprinkle over a squeeze of lemon juice. This will stop the apples from browning.
  4. Chop the dates and fig and add to the nuts.
  5. Stir the nuts mix through the fresh fruit and serve.
  6. it would also be nice to add some fresh blackberries, blueberries, or cranberries to the mix as a variation.

Music to go with it…
Listen on Spotify: Moke – Let it burn

Desiccated Coconut Milk

Desiccated Coconut Milk

Recently for some strange reason we could not find any of the brand of coconut milk that we normally buy. It seemed to be sold out of all of the shops near our home. We looked at the labels of a lot of other brands of coconut milk, but were not happy with what we saw. In addition to a stabilizer, many had preservatives in them, and some other ingredients we didn’t understand.

Around the same time we ended up buying a whole pile of desiccated coconut on a shopping trip to the Indian wholesaler only to find when we got home that we already had quite a lot sitting at the back of the cupboard. OK, so let’s try combining the two and making our own coconut milk! Actually it is pretty simple, and using a blender it is also very fast. No more preservatives or stabilizers in this lot!

This recipe makes both thick and thin coconut milk, in the two presses of the coconut. I recommend that you press them into separate bowls and retain them separately for use in different recipes. The thick coconut milk can be used to replace cream, while the thin coconut milk can be used as a milk replacement in many dishes.

Ingredients

  • 180g desiccated (shredded) coconut
  • 1.25L hot water (5 cups)

Directions

  1. Put the desiccated coconut and half of the water (625ml / 2 1/2 cups) of hot water into a blender.
  2. Blend on high speed for 30 seconds.
  3. Pour the water and coconut mixture out over a fine sieve or a piece of muslin cloth (you could also use a fine tea cloth) with a bowl underneath.
  4. Squeeze all of the excess moisture out by squeezing the coconut in the cloth, or by pressing the coconut with the back of a spoon in the sieve.
  5. This first press of the coconut mixture will be thicker and creamier than the second press of the coconut mixture.
  6. Return the coconut to the blender and put the rest of the hot water in with it (625ml / 2 1/2 cups).
  7. Blend again on high for for 30 seconds
  8. Pour the second lot of water out over a fine sieve or piece of cloth, and a fresh bowl.
  9. This second press of the coconut mixture will be a thin coconut milk, but will normally be more than the first press of the coconut.
  10. Store the thick and thin coconut mixtures separately in airtight containers in the fridge, and use in soups, curries, or beverages.

Music to go with it…
Listen on Spotify: The Mountain Goats – Beat the Champ

Kimchi Chicken

Kimchi chicken

Ingredients

  • 200g chicken breast, finely sliced
  • 200g leek, finely sliced
  • 200g Chinese cabbage Kimchi, chopped up roughly
  • 100g carrot Kimchi (optional)
  • 1 tsp sesame oil
  • 1 Tbsp sesame seeds, toasted
  • 1/2 Tbsp maple syrup
  • a little coconut or other oil to fry

Directions

  1. Fry the chicken in a little coconut or other oil for 2 minutes until the chicken has sealed all over
  2. Add leek and kimchi and fry for 5 more minutes
  3. Add the sesame oil and maple syrup and fry for 1 more minute
  4. Take off the heat, sprinkle with the sesame seeds, and serve hot with boiled rice or cauliflower rice.

Music to go with it…
Listen on Spotify: Eric Wire Hustle – Love Can Prevail

Gluten Free Kimchi Pancakes

Kimchi pancakes

I made a big mix of Kimchi and am spending the week on recipes that can use it in cooking, instead of as an accompaniment. Kimchi pancakes (Kimchijeon in Korean) is a recipe that Korean friends of ours made us when we went to visit them, and this is a variation of that recipe in order to make it gluten free.

These are a savoury pancake, that should get a little bit crispy. In order to make them crispy the water that you add to the mixture needs to be cold, or you can add some ice to cool it down. Do make sure that you use oil in the pan, as this will also help the process of turning them crispy. 

We ate them on their own and with Carrot Kimchi, and they make quite a hearty meal. This recipe makes 8-10 pancakes, which is a little too much for 2 people for lunch. 

We have also made them with some chicken added, and you could also add some finely chopped leeks or spring onions as a variation.

Ingredients

  • 2 cups (500ml) rice flour
  • 2 Tbsp coconut flour
  • 1 egg
  • 550ml cold water
  • 2 cups (500ml) kimchi
  • 5 ice cubes
  • coconut oil or other high heat oil

Directions

  1. Chop the kimchi up finely
  2. Place the rice flour, coconut flour, egg, cold water and kimchi into a bowl. Stir to combine. It should be a fairly watery batter
  3. Heat the oil in a frying pan on a moderate heat
  4. Place the ice cubes into the batter. This will help to cool down the mixture and make sure that your pancakes get crispy. The alternative is to use chilled water out of the fridge when making the mixture.
  5. Using a soup ladle, scoop up a good scoop of the mixture and pour it into the pan. Use the back of the soup ladle to spread the mixture around, making sure that the kimchi is evenly spread across the pan and not in a heap in the middle
  6. Wait until the mixture has cooked through before flipping the pancake over onto the other side. Resist the urge to turn it too soon as it will not go crispy around the edges if you do. Takes 1-2 minutes
  7. Flip the pancake and ensure that it is cooked through – only about 30 seconds to 1 minute on this side.
  8. Serve while stil hot
  9. Makes 8-10 kimchi pancakes

Music to go with it…
Listen on Spotify: The Vaccines – English Graffiti