Tag Archives: #healthy

Homemade Korean Kimchi

Homemade Korean Kimchi

One of our son’s best friends at school is Korean, and his mother was nice enough to give us some Korean gochugaru chilli powder. We had been talking to her about how much we loved Korean food, and that we were keen to try making our own Kimchi. After convincing her to swap a BBQ for a Korean dinner at her place, she decided it was our time to cook next and gifted us the chilli powder to make the much talked about Kimchi.

Kimchi is a fermented vegetable dish, much like sauerkraut, except spicy.  The national dish of Korea (and a national obsession), no Korean meal is complete without it. The fermentation process of making it also makes it great for your gut health and there are many studies on its health benefits.

There is no definitive recipe for Kimchi, rather you can make a lot of variations of the basic recipe. Adding carrot or cucumber are some suggestions to get you started. Enjoy!

Ingredients

  • 2 kg Chinese leaf cabbage
  • 200g sea salt

Kimchi paste

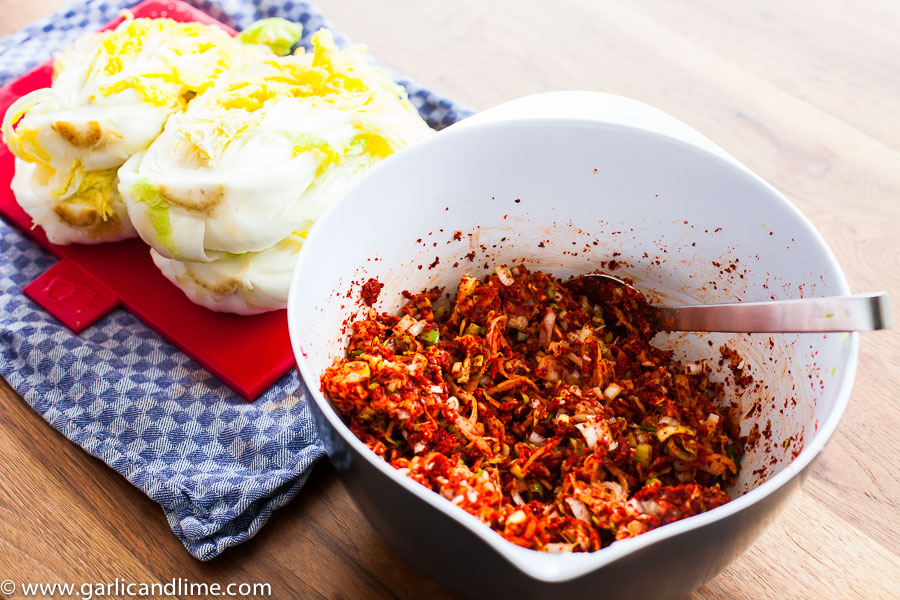
  • 150g gochugaru, Korean Chilli Powder (do not substitute for regular chilli powder as this is more like a paprika powder, with a little chilli added. Regular chilli powder would be far too hot)
  • 300g leek, finely chopped
  • 2 Tbsp garlic, minced
  • 2 Tbsp ginger, finely grated
  • 200g fresh daikon / mooli radish, grate on wide grater, or finely shred (you could substitute for regular radish, but cut it is a little more intense in flavour, so decrease the amount and cut it up finely)
  • 1 Tbsp fish sauce
  • 1-2 Tbsp salt

Directions

  • Cut the Chinese cabbage in half lengthwise to expose all of the leaves. Place the halves cut side up in a bowl. Salt the cabbage layer by layer. You don’t have to be too perfect at this.

Korean Kimchi

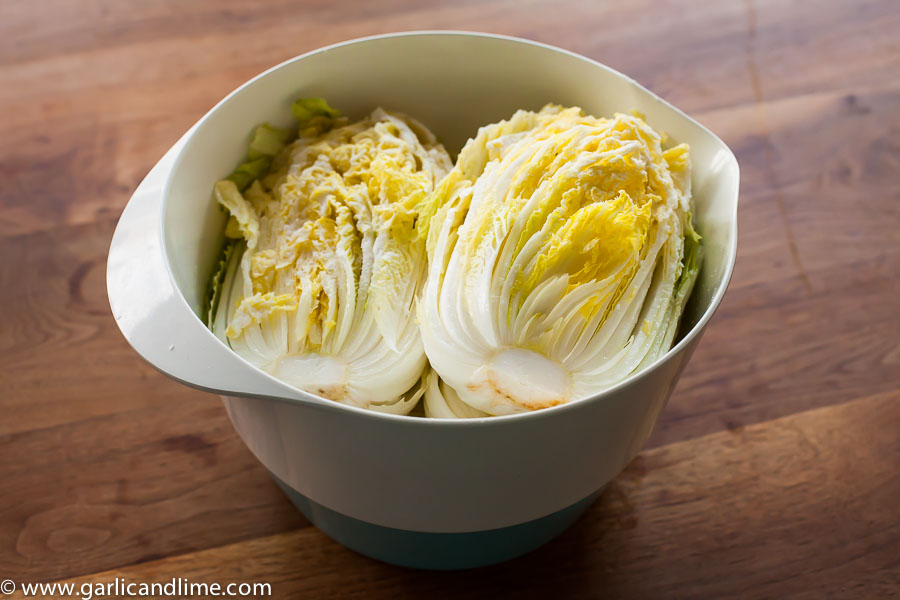
  • Place into a large bowl and cover with enough water to completely submerge it. Place a heave object on top to keep the cabbage submerged under water. I used a pestle, but you could use a bowl, plate, or jar as well.
  • Repeat for each of the cabbage halves until you have used up all of the salt and roughly salted all of the cabbage leaves
  • Cover with a tea-towel and let it stand for 24 hours at room temperature in the brine mixture.
  • Drain the water and taste a bit of the cabbage from the middle to check for how salty it has become.
  • A good kimchi contains enough salt, but to get it right it is important to taste it. If it is very salty then you need to rinse it more. Rinse it multiple times, tasting from a middle leaf each time until it is just too salty for your taste. If it tastes salty enough for your taste, then it is probably not salty enough, and you should add more salt to the mixture (2 Tbsp rather than 1 Tbsp) when you are making the kimchi paste.
  • Carefully squeeze the liquid out of the Chinese cabbage
  • Mix together all of the kimchi paste ingredients in a bowl.

Korean Kimchi

  • Either you can leave the cabbage halves still whole, or you can cut the ends off them in order to separate the leaves. I cut the ends off to make it easier to put them into the jar that I had available.
  • Mix the Chinese cabbage and kimchi paste thoroughly with your hands. It will wash off easily, and there isn’t really a good substitute to just getting in there and getting dirty!

Homemade Korean Kimchi

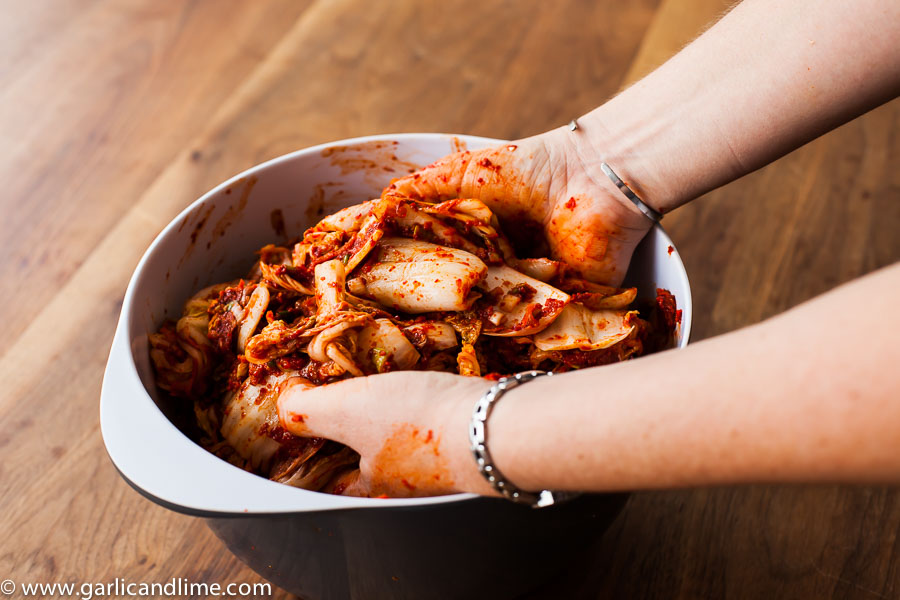
  • If you are leaving the cabbage halves whole, then make sure that you lift the leaves up and press the paste in between them.
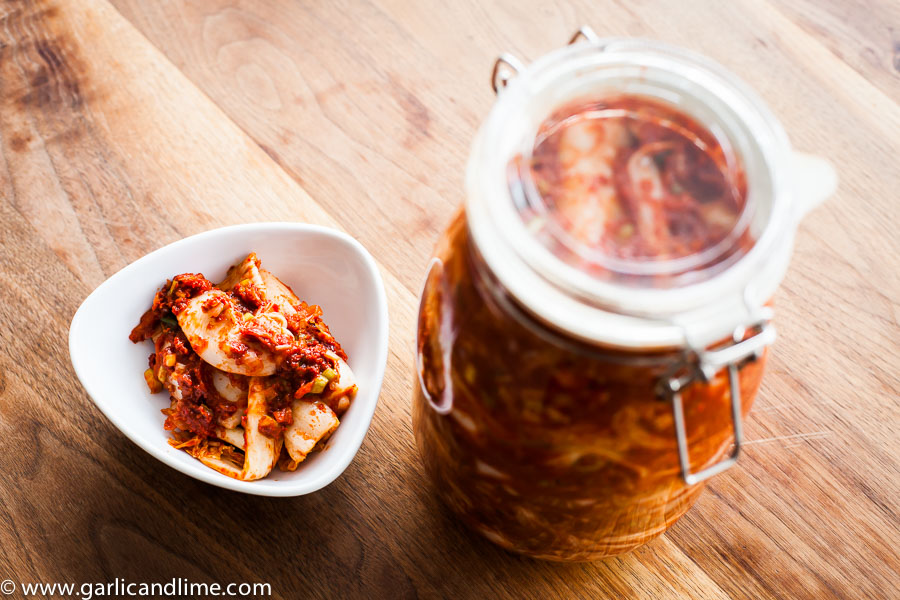
  • Place the kimchi into a jar or bowl with a tight fitting lid. Press into the container so that it is tightly packed, but don’t use too much force in doing so. You just want to press it into the container to completely fill it.
  • Leave the kimchi to stand on the bench for 24 hours.
  • Transfer to the fridge and leave it for 7-10 days before you start to eat it.
  • It will last for around 2 months in the fridge.

Music to go with it…
Listen on Spotify: The Very Best – Makes a King

Turkish Snack Bars

Turkish snack bars

We didn’t enter a wholefood lifestyle to lose weight. We started looking after ourselves better to improve our health and start feeling better. But the consequence has also been that as we have taken out the junk, the processed food, and the fried food from our diets, our weight has also dropped. But we also don’t want it to drop too much or too fast.

That is where a little bit of healthy snacking comes in. But most shop bought snacks have ingredients I don’t recognize, or sugar that I don’t want to eat. The alternative are pretty expensive raw snack bars. As a result, we have taken to making our own snack bars and keeping them in the fridge. I make one or two batches in the weekend (which takes me less than 10 minutes) and they keep all week. Given that they are all dried ingredients, they should actually keep quite a long time, but they have never last longer than a week in our house to find out.

These snack bars are inspired by the flavours of Turkey. Rich pistachios and almonds are bound together with the sweetness and stickiness of dates. They are a great snack to keep in the fridge and snack on with an espresso or on its own.

Ingredients

  • 1 cup pistachios
  • 1 cup dried apricots
  • 1 cup dried dates
  • 10g extra pistachios, chopped, for garnishing

Directions

  1. Place the pistachios in a food processor with the metal knife blade inserted. Pulse until they are finely chopped.
  2. Add the apricots and dates to the food processor and turn the speed up to a medium speed. Process for about 1 minute until the fruits and nuts are all finely chopped and start to stick together.
  3. Grease a metal tray with a little coconut oil. Pour the mixture onto the tray and press down firmly with your hands to form a large square / rectangular shape. You need to press quite firmly to press all of the mixture together.
  4. Chop the extra 10g (a small handful) of pistachios and sprinkle over the top of the bar. Press down into the mixture with your hands firmly so that it sticks into the bars as a garnish
  5. Place in the fridge for an hour
  6. Cut into bar shapes and store in an airtight plastic container between layers of greaseproof baking paper.

Music to go with it…
Listen on Spotify:

Dairy Free Ice-Cream

Dairy Free Ice-Cream

The summer has well and truly heated up in Singapore! We are sitting in 35 degrees and high humidity. While I am not usually big on deserts, this evening we went out to dinner for sushi and my son was looking longingly at the ice-creams at the back of the menu. Matcha Green Tea and Chocolate ice-creams. One he won’t end up eating (but liked the idea of) and the other one I wasn’t so keen on him eating. 

So I decided to make our own ice-cream instead. I had put some bananas in the freezer to try out making my own dairy free ice-cream a couple of days ago, so whipping this up was pretty quick. I have to say, that with these ingredients, I won’t be so worried about skipping desert to be healthy anymore 🙂

Ingredients

  • 2 bananas
  • 50g frozen raspberries or other fruit of your choice
  • 10 pistachios, finely chopped

Directions

  1. Place 2 ripe bananas in the freezer over night (or longer if you like)
  2. Carefully peel the bananas using a sharp knife
  3. Slice the bananas into 0.5cm wide slices with a sharp knife
  4. Place the bananas and frozen fruit into a food processor with the metal knife blade (you could also use a blender, but it is a bit trickier to get it evenly blended without melting)
  5. Pulse the fruit several times until it has broken up into small grains of fruit.
  6. Turn the foodprocessor dial onto a medium setting to churn the frozen fruit into a creamy texture. You will need to stop it quite a few times and wipe the mixture down the side of the bowl in order to get an even texture.
  7. Watch it closely and stop it as soon as it has turned into an evenly blended ice-cream.
  8. Serve immediately topped with finely chopped pistachios to garnish

Music to go with it…
Listen on Spotify: Hozier – Hozier (Deluxe)

Moroccan Snack Bars

Moroccan Bars

We love to have some healthy snacks in the fridge to get us through those moments when the next meal is just a little bit far off for our stomachs. These bars have no artificial ingredients or sugars, and are made of whole nuts and dried fruits. It is a good idea to check the ingredients list on dried fruits though, because sometimes oils are used in the drying process, sugars are added, or chemicals are used. We try to avoid all of these, and figs and dates seem to be the most easy of dried fruits to find without these additives.

These snack bars aren’t an authentic recipe from Morocco, but rather a bar that is inspired by the fruits and nuts that grow so well in this very fertile country. Famous for almonds, apricots, pistachios, figs and dates, the Moroccan kitchen is full of flavour.

Ingredients

  • 1 cup dried dates, chopped
  • 1 cup dried figs, chopped
  • 1/4 cup blanched almonds
  • 1/4 cup pistachios
  • 1/4 cup pine nuts
  • 1/4 cup cashew nuts

Directions

  1. Dry roast the pine nuts in a frying pan over a moderate heat. Toast until they are golden brown. Remove from the pan.
  2. Dry roast the almonds and cashew nuts in a frying pan over a moderate heat. Toast until they are golden brown. Remove from the pan.
  3. Place all of the nuts in a food processor with the metal knife blade inserted. Pulse until the nuts are finely chopped.
  4. Add the fruits to the food processor and turn the speed up to a medium speed. Process for about 1 minute until the fruits and nuts are all finely chopped and start to stick together.
  5. Grease a metal tray with a little coconut oil. Pour the mixture onto the tray and press down firmly with your hands to form a large square / rectangular shape. You need to press quite firmly to press all of the mixture together.
  6. Place in the fridge for an hour
  7. Cut into bar shapes and store in an airtight plastic container between layers of greaseproof baking paper.

Music to go with it…
Listen on Spotify:

Thai Green Chicken Curry

Thai Green Chicken Curry

A Thai curry is a very regular event at our table. It is one of our go to, mid week meals. We love to spice it up. You can adjust the spiciness with how much curry paste you add, and it depends on how spicy the paste is that you use as well, so do experiment a little to vary it to your own taste. We make our own paste, but we also have found a very good paste from a Thai supermarket that avoids any nasty ingredients as well. Up to you which you prefer.

Ingredients

  • 1 cup coconut cream
  • 1-2 Tbsp green curry paste (store bought, or see the separate recipe to make your own Green Curry Paste)
  • 1 cup coconut milk
  • 1 cup water
  • 2 Tbsp fish sauce – check the label carefully to make sure it is just fish and salt and does not have other nasty ingredients (or use vegan fish sauce if you are vegetarian or vegan)
  • 2 chicken breasts, cut into bite sized portions.
  • 1 onion, sliced
  • 2 handfuls pea aubergines
  • 6-8 apple aubergines, cut into wedges
  • (If you can’t find the pea and apple aubergines then use green beans, mushrooms and regular aubergines instead or any other vegetable that you like)
  • large handful of Thai basil
  • few kaffir lime leaves
  • 2 large red chillies, cut on the diagonal to give slices

Directions

  1. Put the coconut cream into a frying pan, add the curry paste. Cook over a moderate heat for a minute or two. Keep on stirring to make sure it does not stick or burn.
  2. Add the coconut milk and water and stir well to combine
  3. Season with fish sauce
  4. Add the chicken and cook slowly for about 10 minutes
  5. Add the vegetables and cook for 5-7 minutes until the aubergines are cooked through
  6. Add the kaffir lime leaves and Thai basil. Stir well and simmer for another minute
  7. Remove from the heat and garnish with sliced red chillies.
  8. Serve with (cauliflower) rice and a green mango or papaya salad

Music to go with it…
Listen on Spotify: Brooklyn Brothers – The Album

Fig, Plum and Almond Healthy Snack Bars

Fig, Almond and Plum bars

We have been buying healthy snack bars to take with us on the occasions that we are out an about and want to have a snack with us. But they are very expensive, so I took a look at the ingredient list of some wholefood ones we liked, and tried to recreate something similar. These are really easy to make and delicious!

Ingredients

  • 1/2 a cup pitted plums (check the ingredients list to make sure you are not getting a lot of additives)
  • 1/2 a cup dried figs
  • 1/2 a cup almonds
  • A little olive oil or coconut oil for greasing

Directions

  1. Place the almonds in a food processor, and using the metal knife blade blend them until the almonds have broken into small chunks. This will take about a minute.
  2. Add the plums and figs to the food processor and blend until the mixture starts to turn into a ball.
  3. Grease a metal sheet (I used the based of a cake tin) with a little olive or coconut oil
  4. Place the mixture onto the metal sheet, and using your hands shape it out into a roughly square / rectangular shape so that you are able to cut it into bars. Make sure you press the mixture together really firmly.
  5. Cut the mixture into bars shapes and remove from the metal sheet (you might need to use a knife to do this)
  6. Store in an air tight container in the fridge or pantry

Music to go with it…
Listen on Spotify: Calexico – Edge of the Sun

Paleo Shepherd’s Pie

Paleo Shepherd's pie

This recipe calls out for a Winter’s dining room, complete with a log fire burning and candles on the table. Unfortunately we live in Singapore, so we enjoyed this rosemary and thyme laden dish in the heat of the summer instead. With the cold snap in New Zealand at the moment, I am sure it could warm many a stomach.

Ingredients

  • 1 onion, chopped
  • 2 carrots, finely chopped
  • 3 garlic cloves, finely chopped
  • coconut oil to fry
  • 500g beef mince
  • 4 Tbsp soya sauce, tamari or coconut aminos
  • 2 tsp balsamic vinegar
  • 1 tsp thyme leaves, dried
  • leaves of one stick of fresh rosemary, chopped (or 1 tsp rosemary, dried)
  • 50ml water
  • 1 sweet potato (yellow looks best, but any colour will do), sliced finely
  • Sea salt and freshly ground black pepper

Directions

  1. Pre-heat the oven to 180 degrees Celsius (350 degrees Fahrenheit)
  2. Heat the pan to a moderate heat and add the coconut oil. Fry off the onion, garlic and carrot until the onion is soft and fragrant – about 3 minutes
  3. Add the beef mince and fry until it has browned
  4. Add the soya sauce / coconut aminos, balsamic vinegar, thyme and rosemary to the pan and stir well. Cook for 2 minutes stirring occasionally
  5. Sprinkle over a pinch of sea salt and some freshly ground black pepper. Stir to combine.
  6. Add the water and turn the heat down to a low heat. Leave it to slowly cook for around 15 minutes. Keep an eye on it and add a little more water if needed to stop it from drying out.
  7. Remove the meat from the heat and pour into a pie dish. I used one 25cm x 15cm.
  8. Slice the sweet potato finely and layer over the top of the pie in overlapping rows. Sprinkle over sea salt and more rosemary (fresh or dried)
  9. Place the pie dish into the hot oven and cook at 180 degrees Celsius (350 degrees Fahrenheit) for 15-20 minutes until the sweet potato has cooked through and become crispy. They should be like potato chips on top of the pie.
  10. Serves 2-3

Music to go with it…
Listen on Spotify:Tourist LeMC – En Route

Race Announcer Watermelon Pineapple Juice

Pineapple and watermelon juice

This is a super simple juice that is naturally approved by our little Juice Master Liam. Watermelon has a lot of juice in it, and very little fibre, so it lends itself better to the blender than the juicer. The pineapple on the other hand is easier to juice as you don’t have to do as much preparation work on making sure you get rid of all of the hard skin. You can just roughly peel it and let the juicer do the rest.

Ingredients

  • 1 whole pineapple
  • 1/4 of a large watermelon

Directions

  1. Cut the top and the bottom off the pineapple. Cut the harder outside off the sides of the pineapple. Cut the pineapple into quarters so that it fits into your juicer tube. Don’t worry if there are a few spikes left on the pineapple here and there, the juicer will get rid of them anyway when it takes over.
  2. Cut watermelon into pieces that are easy enough to cut the hard outside off them. Chop the watermelon into pieces roughly 2cm square.
  3. If you are using a centrifugal juicer, then put it onto the slow speed. Pineapple has a lot of liquid to it and you will get more juice out of it on a slower speed. Juice the Pineapple.
  4. Place the pineapple juice into the blender. Add all of the pieces of Watermelon. Blender on a high speed for about 1 minute until the watermelon is totally blended to a juice.
  5. Serve over ice

Music to go with it…
Listen on Spotify: French for Rabbits – Spirits


Butternut and Zucchini Loaf

Butternut and Zucchini loaf

Bread is a bit of a challenge when you are gluten, sugar and dairy free. This loaf is naturally sweetened by dates and pumpkin, and given structure through the coconut flour and zucchini. It is delicious, healthy, and sneaks a few extra veggies into your lunch.

Ingredients

  • 1/2 a large zucchini, or 1 whole small zucchini (courgette), finely grated, squeezed
  • 350 g butternut squash (butternut pumpkin), cubed, cooked for 10 minutes and mashed
  • 3 eggs
  • 1 tsp baking soda
  • 1 Tbsp ghee
  • 1 heaped tsp cinnamon
  • 1/4 tsp nutmeg
  • large pinch of sea salt
  • 2cm fresh ginger, peeled and grated
  • handful chopped cashews, toasted with 1 tsp coconut oil and a pinch of sea salt
  • 5 dates, chopped
  • 1/2 tsp dried rosemary
  • sea salt for sprinkling on top
  • 2/3 cup of coconut flour

Directions

  1. Pre-heat the oven to 180 degrees celcius (350 degrees Fahrenheit)
  2. Boil the butternut squash (butternut pumpkin) for 10 minutes in boiling water until it is cooked through. Drain and let it cool a little so that it will not cook the eggs when you add them to the squash mixture. Mash to a smooth consistency.
  3. Add the eggs and ghee and mix well.
  4. Grate the zucchini. Place the grated zucchini into a tea towel and squeeze it firmly to remove all of the liquid. You may need to use a fair bit of pressure.
  5. In another bowl, add the zucchini with the baking soda, cinnamon, nutmeg, salt, ginger, rosemary, and dates. Mix well.
  6. Add the zucchini mixture to the squash mixture and stir well to combine.
  7. Add the coconut flour, and fold into the mixture. You should have a thick mixture with little moisture. Depending on how moist your zucchini was still, you might need to add a little more coconut flour. The coconut flour will absorb the moisture.
  8. Toast the cashew nuts in a hot pan together with a pinch of salt and 1 tsp of coconut oil until they are golden in colour.
  9. Add the toasted cashew nuts to the mix and stir through.
  10. Line a bread loaf tin with baking paper. Transfer the mixture into the bread loaf tin.
  11. Cook at 180 degrees celcius (350 degrees Fahrenheit) for about 45 minutes until golden brown and a fork inserted into it comes out clean.

Music to go with it…
Listen on Spotify: Future Islands – Singles


Thrive Rockmelon Juice

Thrive rockmelon juice

At the food market yesterday Liam decided that he was going to choose all of the fruits and vegetables, and rockmelon was amoungst his selection. This is his  creation this morning.

Ingredients

  • 1 rockmelon
  • 1 orange (whole)
  • 1 lime
  • 2 red apples (whole, washed)
  • 2 pears (whole, washed)
  • Centrifugal or slow juicer

Directions

  1. Cut the rockmelon into slices that will fit into your juicer tube. Remove the hard rind from the melon.
  2. Wash the apples and pears, and remove the stalks. (Only cut them if needed to fit into your juicer tube)
  3. Put the rockmelon, lime and orange (not peeled) through the juicer on the slow speed.
  4. Put the apples and pears through the juicer on the fast speed.
  5. Stir to combine all of the juices together and serve over ice.
  6. Makes 4-5 glasses.

Music to go with it…
Listen on Spotify: Haim – Days are Gone